Tutorial
Designing the Pattern
Creating the pattern involves both the size and layout of the item as well as the carving pattern. The project being laid out in this example is a checkbook cover. To identify the dimensions of the cover, lay out the check blanks and the register the way they will appear when the checkbook is open. Be sure to leave enough room between the two to allow the cover to fold in half. Add a suitable border width all the way around to accommodate stitching or lacing and a small margin for "extra room"" (just to be on the safe side). The space required for these extra dimensions (the fold, stitching, and extra room) depends on the leather thickness, thickness of material that goes inside (i.e., the checks), and personal preferences. The result is the total dimension of the carving leather that needs to be cut.
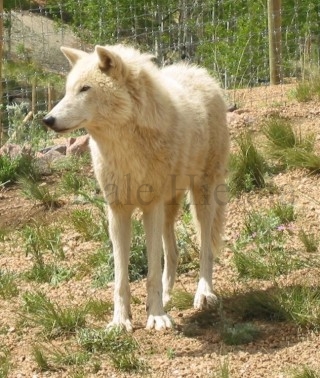
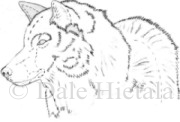
I will often create a carving pattern from photographs I have taken of different subject matter. In this case, I have chosen a resident of a wildlife refuge in the local area (picture below, left). From this photograph, create a carving pattern (picture below, right). There are several ways to create a line drawing from a photograph. What I have most success with is digitizing the photo and printing a gray-scale copy on regular paper. (I have done it by photocopying the photo, but the quality of the copy is more difficult to work with). The copy is put on a light table and covered with tracing or layout paper and a line drawing is traced around those areas needed to successfully carve the design.
For this project I also created a background. Although some elements are traced in a similar manner, this background pattern is largely done freehand since I didn't require a lot of detail for the elements in the background.
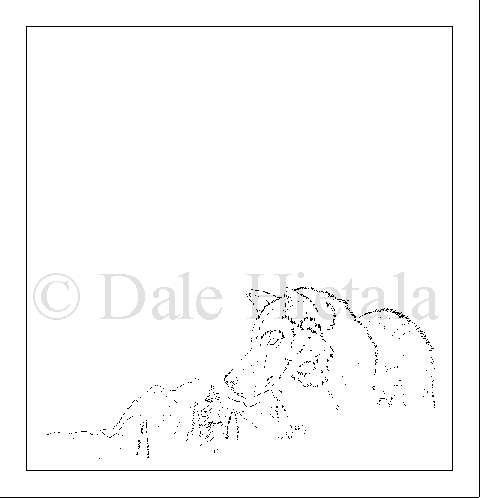
With the three components just created (dimension, main subject, and background), I again digitize them and arrange them into a pleasing pattern. The benefit of working patterns in the computer is that you can scale elements, rearrange them, and omit certain parts to see how they look before actually printing it on paper. The final result is shown below.